Monday, March 21, 2011

New Pattern! “Violets In My Garden”


I finally have the pattern ready to sell!
As always, I’m offering a special pre-sale price, good only for a few days….and only on my blog site.
This wool candle mat measures about 13” across.  It’s shown made with 100% wool but wool felt could be substituted for any or all of the wool requirements. 
My last post has shown this made with a black background too …

Special sale price for the pattern is $8.50 which includes shipping.
The price will go up to the regular pattern price of $9.50 on Friday, March 25.
  This price is for US and Canada only.  All other international will split the remaining postal cost, which is usually less than a $1.
If you wish to purchase with Paypal, just click the little button over there on the left to purchase.  If you wish to pay by check, just email me for my mailing info.  cathspennies@gmail.com 
I will have wool kits available next week.  Price and other info will be available then.

Monday, March 14, 2011

“Violets In My Garden” Candle Mat -->Let’s make it today!

CIMG0156

This is my newest design.  I’m calling it “Violets In My Garden”

I should have the pattern ready to sell by early next week, so keep watch.

I made this one with white wool and a green background and I also tried one with a black background …

CIMG0154

This one didn’t get a green background on it.  Without the green background the leaves really stand out

I couldn’t tell you which colors I like the best.  They both turned out so pretty. 

I made this two ways just to show all of you how it’s so easy to make one design look completely different just by changing up the colors or adding a background. 

The violet flowers shown on the two mats are a dark pink and a purple.  I think two shades of purples would be pretty, or purple yellow flowers would be really nice too.  Actually, a big mix of all different colors would be gorgeous.  

So think outside the box when deciding the colors to use for any of your candle mat creations.  Just because the pattern picture shows certain colors, doesn’t mean that you have to use those colors!  Make it your own by being different!

So, I’m going to go through some of the steps to make this. 

Everyone should know by now that even though I’m showing how to make this, I would really appreciate it if you would purchase the pattern.  If you make this without buying the pattern, it’s considered stealing, so keep that in mind. 

Ok? Ok.

The most time consuming part of this is the cutting part.  There are lots of little leaves and flowers to cut.  If you have one of those nifty diecutters that will cut those flowers, by all means use it!  It will save much pain on your fingers!

I don’t mind the cutting, actually.  I usually cut as I need them so that helps with the finger pain.  And I like the way hand-cut flowers look rather than the die cut flowers.  But that’s my own personal preference.

So to start, I cut out my background scallop shape.

CIMG0127 Using a ruler and a chalk pencil, I marked off the individual sections.

I only use white chalk.  I’ve tried colored chalk and have found it to be very difficult to remove from the wool. 

CIMG0130 Here, I’ve quickly basted across the mat so that each scalloped section is clearly defined.  The basting stitches will be pulled out once the top is completed.

It’s worth the extra five minutes that it takes to do this. It makes it so much easier to stitch those leaves and flowers in their own space without overlapping into the scalloped space beside them. 

CIMG0135 I’ve centered the top leaves and will pin them in place.  CIMG0131 Now the bottom leaves will be pinned in place and I’m ready to stitch them down. 

CIMG0134 With a backstitch, I stitched the veins down the centers of each of the leaves.   I’ve used really thick coat weight wool for the white background so this makes those leaves really stand out.  Regular weight wool will still make the leaves pop out like this, just not as much.

CIMG0136 That’s all that needs done with the leaves.  Do this eight times around the mat and the leaves are done.CIMG0137 The violets are stitched in place with french knots.  As long as you’re using good felted wool for this, the wool won’t unravel so there’s no need to stitch the edges down.  Be sure to test your wool before stitching to make sure that your wool is felted enough to use for this.

Simply cut some of the wool and pull on it.  If it pulls apart, don’t use it for the flowers.

CIMG0138 The flowers are all stitched in place and it looks really pretty with just the three flowers in each grouping so if you’re making this and like this look, you can call it finished at this point, but I like the details of the little flower buds.  So the flower buds are added in simply by tacking it down with a whip stitch. 

CIMG0144 I stem stitched the lines in to make the flower stems and it’s almost finished!

It’s at this point that I have to decide whether to attach a background to this or not. 

I love the look of it the way it’s shown here because the leaves are the real highlight of the mat. 

Adding the background makes the leaves blend in more with the flowers which make give the flowers a little more emphasis.

CIMG0149 You will have to decide which way you like it better!

I think that perhaps a dark pink or matching violet purple background would show up nicely too.  I choose green though simply because it would match most customers decor better.

Here’s one that I made several years ago with a purple background …

Pictures 134

It sure is pretty, isn’t it?  


Happy Day everyone!

Friday, March 11, 2011

Snow In March Is Just Not Right

So here it is, March 11th.  We wake up to snow on the ground.  And not just a little dusting of snow.  This is a LOT of snow … a good 4” right now with another 3” to come throughout the day today.
It’s just not right.
So I’m awake early this morning.  It’s but it’s not because of the snow. It’s because things were not ordinary in our household.
You know how you get so used to the same routine day in and day out?  We'll today, for some odd reason, the routine was not there.
Hubby woke up at his regular, get up for work time of 5:15 am.
He got dressed and … wait … he ALWAYS gives me a kiss goodbye and lets me go back to sleep.  But he didn’t do that this time.  He forgot the kiss goodbye.
“What’s up with that?”  I think.  Then waking up slightly, I remembered that he told me last night that he didn’t have to be at work until 9am today.
Ok, so now that is figured out, I nestle my head back into my soft feather pillow and proceed to fall back to sleep.
Wait!   Hmm… I hear someone in the bathroom, taking a shower.
“What’s up with that?”, I think. Waking up even more, I’m really puzzled because I know it’s not hubby taking a shower.  He doesn’t normally shower in the morning and besides, I heard him going downstairs and I’m smelling the coffee brewing.
It couldn’t be Rachel showering because at 5:30 am, it’s way too early for her to be up to get ready for work.  But it must be Rachel because there’s no one else living here that it could be!
By this time, I’m pretty much awake.  I roll myself outta bed, go downstairs to find hubby so that I could ask him why our daughter is up an hour earlier than her normal, routine time.
“I dunno why she’s up so early.” he says.
So I went back upstairs, opened the bathroom door slightly and here’s how the conversation went.
“good morning Rach”, I say
“good morning Mom!”, says Rach.
“did you know that it’s only 5:30?” I say.
“No it’s not.” says Rach, matter of factly.
“Yes, Rach. it’s 5:30.” I say
“No, it’s not” says Rach, matter of factly again, (because she knows that she’s never wrong)
“Rach, I just went down to ask daddy why you’re up so early and it is indeed only 5:30.” I say.
long pause “My alarm went off”  says Rach.
Well, apparently, her phone alarm sensed that daylight savings time starts this weekend and decided to spring ahead 24 hours ahead of time to get ready for it.
So here we are, all three of us, wide awake with a messed up daily routine.  I hope the day goes back to normal soon.

So I’m done with stitching up my newest design but I’m going to wait to show the finished results.  I want to make it up with a white background now too. 
Since I haven’t shown any pictures yet in this post, I’ll answer a question that I received from a reader.
She asked me which of my designs, out of all the penny rugs that I’ve made, is my favorite.
I didn’t even really have to think much about that.
By far, my favorite is “The Strawberry Patch”.
StrawberriesThe picture doesn’t even come close to showing just how gorgeous this really is.
My favorite holiday candle mat is still “Stockings of Joy”.
EBAYSTPIC And once again, the picture just doesn’t show how pretty this is when finished.  The pine branches, the hearts dangling from the stockings, the cute little gingerbread men … it’s just so incredibly nice. 
Of course, I have a favorite that I haven’t sold the pattern for:
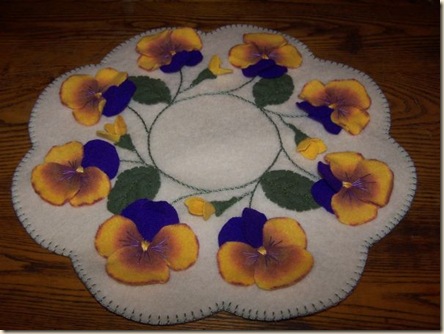
Picture 146  I’ve been asked a ridiculous amount of times to make this into a pattern, but I haven’t yet.  The special dyeing that I do for those petals just can’t be done easily.  It takes a lot of time to dye each of those petals to get that look, so I keep this design as an original finished design pattern that is for sale only as a finished item.
I love those pansies!
Picture 125
Picture 151
It’s almost pansy making season, so these pictures are helping to get me in that mood, in spite of all the freshly fallen snow out there on the ground.

Happy Day everyone!

Tuesday, March 8, 2011

Let’s ThinK About Spring Flowers

I don’t know about you, but it’s this time of year that I start thinking about flowers. 
It’s not something that I force myself to think about just to help me get through the rest of these cold wintery days.  I just automatically/instinctively think about flowers.
This is the time of year that I start my flower seeds indoors, so I think that has a lot to do with it. 
But I love stitching flowers too.  All kinds of flowers.
Pansies, geraniums, tulips,  … gosh I could go on and on.  From all the penny rug candle mats that I’ve made with flowers, I’ve not done many to sell as patterns. 
So I think it’s time to start introducing some of my flower designs to sell as patterns.
I’ll start with Violets.
violets
I made this design a few years ago to sell as a finished candle mat. I’ve had lots of requests for the pattern for this one, so now it’s time.
You can see, I’m not quite finished with it, but I hope to get it finished by tonight. 
I love this design.  It was inspired by the wallpaper border that I have upstairs in our bedroom…wallpaper

Ok, yes, I realize that they really don’t look much alike at first glance, but look at those mottled leave colors.  And notice how the leaves are arranged to make the base and the flowers branch up from them.
That’s the look that I want. 
Ok, I’m off to get this finished.

Happy Day everyone!

Thursday, March 3, 2011

Let’s Mottle Some Wool With Coffee Today!


I’m pretty sure that I’ve shown how this is done before but rather than search through all my posts to find it, I’ll just show it again!

I sometimes use coffee to dye my wools.  As long as it’s done right, the results are as good as, if not better than using regular dyes.

The coffee gives it a really nice rich brown color and is perfect for bunnies, sheep, and santa beards.

So let’s get started…

CIMG0101 First thing is to soak the wool in some warm soapy water.  I use regular hair shampoo for the soap but non-bleach type dish soap can be used too.

CIMG0103 While it soaks, I preheat the oven to 325.

CIMG0104 After soaking the wool for about 15 mins or so, I squish the wet wool onto my old baking sheet. 

Since this is a fairly large piece of wool … about 15” x 60”, I used this size baking sheet.  If I mottle or dye smaller pieces of wool, I adjust the size of the baking sheet accordingly.  I have a few assorted smaller baking dishes that I use for smaller amounts of wool.

I tried to evenly space and crumple the wool across the baking sheet.

The trick to good mottling is to crumble that wool to make high and low spaces.  So if you’re just doing a small piece of wool, just make sure that it’s bunched up on your baking surface.

CIMG0106 I pour spots of brewed coffee onto the wool.  To get good mottling, I don’t submerse the wool in coffee, I randomly spot it.

If I just want the wool mostly white with a little brown mottling, I lightly spot the wool with the coffee. 

In this case, I want more brown than white so naturally more coffee is poured on.

CIMG0107 Before putting this in the oven, I make sure that the wool is wet enough.  If needed, I put a little extra water on or add a little extra coffee.  I don’t want this to dry out and burn while it’s baking. 

I will bake this about 20-30 min, watching it closely to make sure it doesn’t get too dry.  If it’s getting too dry, I either add a little more water, or if I don’t mind if it gets darker, I’ll add more coffee.

CIMG0111 After the baking period, I rinse the wool well with cold water.

CIMG0112Then I soak it in some nice smelling shampoo to get rid of that coffee smell.  If you don’t mind your wool smelling like coffee then just skip this step!

CIMG0113 

After rinsing again, I’ll put this in the dryer with a couple pairs of old jeans.  The heavy weight of the jeans will fluff this wool up nicely while it’s drying.  I’ll dry it until it’s almost dry.  I want a little bit of moisture in it so that the wrinkles will easily smooth out. 

If I happen to dry it too much, I’ll just have to take extra time to steam iron the wrinkles out.

CIMG0118 And here it is, dried and ready to use!

The mottled wool is shown against the original color natural wool so that you can see the difference.


Happy Day everyone … and have some fun with coffee today!