Thursday, October 29, 2009

Pattern is in the Mail

Wow, that took a lot of time to get this first pattern ready, from start to finish, but I'm finally done with the details and all ordered patterns are in the mail and on the way to their new owners.

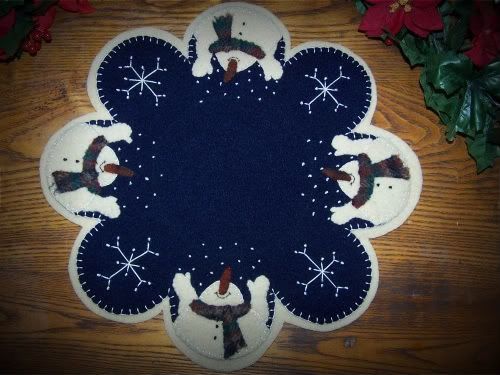
If anyone else wishes to purchase this pattern, click on the Paypal button up there at the top left of this page.(Where it says "Buy Now") You send me $9.00 which includes shipping and I'll send you this "Let It Snow" pattern.


Next pattern to work on is this design from last year. It's my most favorite Christmas design that I've ever done. It's really not difficult to make and while I make this one, just like the "Let It Snow" candle mat, I'll give a little tutorial along the way.
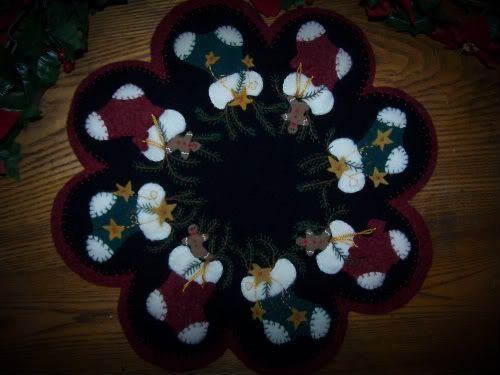
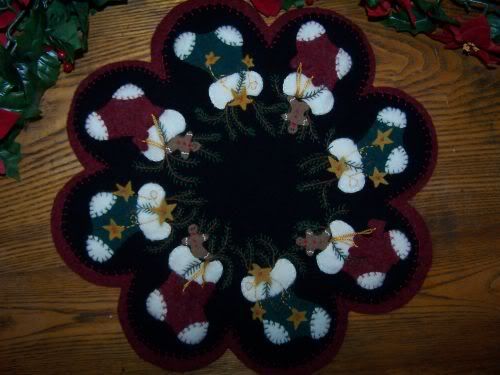
There's a lot of embroidery stitching with this and that's what takes the most time. Those pine branches are tedious to stitch but it's easy stitching.
I'll get started making the candle mat and writing the pattern intstructions tomorrow. Today is house cleaning/laundry day.
Speaking of laundry, every time now, while doing laundry and throwin a dryer sheet in the dryer, I think of my two daughters, Jen and Rach, and I have to laugh.
Since probably their early teens, both girls, when living at home, would do their own laundry for the most part. I'm no dummy ... I hate washing clothes so why not teach them early to wash their own? Anyway, my little trick to saving $$ on dryer sheets is to only use half a dryer sheet for each load. They are easy enough to tear in half and it always seems to work fine for me ... and really saves on the cost too. I would NEVER see whole, used dryer sheets laying around so I just assumed that both girls were doing the same thing ... only using half the dryer sheet, as I taught them.
I just recently learned from Rachel that all those years while doing her own laundry, she used a whole drying sheet but to avoid my wrath, she would tear the sheet in half and then throw BOTH into the dryer. She tricked me all those years and I never suspected.
There's more to this story however ....
So one day, not too long ago, I was relaying the Rachel/dryer sheet trickery stunt to my precious Jen, who need I say, is absolutely the most perfect daughter any parent would want to have. She would never do anything as devious as trick her mother for YEARS with a dryer sheet stunt like her sister.
Well, guess what?
She tricked me for years doing exactly the same thing! She's 27 now so she kept that a secret for a long time.
And the really funny thing is .. neither one knew that the other was doing exactly the same thing!
I'd say at the very least, as punishment, my daughters should owe me mulitple boxes of Bounce dryer sheets.
Doing some quick math in my head ... each girl giving me 10 years worth of dryer sheets = 20 years of dryer sheets.
If I tear those dryer sheets in half, I'll have 40 years worth of dryer sheets .... more than enough to last the rest of my lifetime.
Happy day everyone!

Tuesday, October 27, 2009

Let It Snow! : Tutorial #3 FINISHED!

Haha, I know I'm thinking, "wow, isn't she done with this candle mat yet??" It seems like it's taken forever to finish but that's only because I spent most of the time perfecting the pattern itself, getting it ready for printing.

Just to remind y'all, this is my own design. Please don't steal it! Purchase a pattern. Then, as long as you remember to give me the proper credit as the designer in your seller listings, you can do whatever you wish with the design.
Last year, for selling on Ebay, I made different sizes of candle mats, pinkeeps, and mugrugs, using this design. Once you've purchased the pattern, use your imagination to create whatever you wish with the design. I'm really anxious to see your results!


Let's finish this candle mat up today, ok?

I've embroidered the big snowflakes on which was shown in the last tutorial and now all I need to do is add the french knot falling snow above the snowman head. I start by making an arch with the french knots and just filling in from there. It doesn't have to be perfect, just try to space them evenly above his head.
Now it's time to center the mat onto the white background. Wool tends to stretch easily so even if your background is cut out exactly, you still have to work with those scallops to get them aligned evenly onto the white background. Taking one scallop at a time, measure and pin the blue onto the white, making sure that 1/2" of the white edge is showing. Blanket stitch through all thicknesses and it's looking like a completed candle mat now!

So at this point, if you've nicely tucked in and hid those threads on the backside, your mat is finished, if you want it to be. It also looks nice to blanket stitch through that single thickness of the white edging too.
I prefer to finish off that outside edge, so let's put a backing on this just to make it extra nice and thick.

Adding a backing to this, is an extra expense because of the extra wool that is used, but it's really worth it to give the mat a really nice finished look and feel. You can see from the picture how nice and thick this is now and once it's steam pressed, it lays so nicely on the table too.
Yeap, here's the finished "Let It Snow" candle mat. I just need to take it to the ironing board and steam press the back.

I received a question the other day about what size needles I use. I have to laugh at that question ... not because it's a silly question ... it's actually a very good question. It's just that I really don't know how to answer it! I don't know what size needles I use!
This is a picture of the pincushion that I use everyday. It's huge, yes. It has probably at least a dozen needles in it, all different sizes. When I need a needle for whatever I'm doing, most times, I just randomly grab a needle out of that mess and if the thread that I'm using doesn't fit through the eye of the needle, I put it back and grab another. haha ... sorry, I can't help any more than that! Just buy a pack of assorted sizes and stick them into your favorite pincushion. If anyone out there knows the answer to that question, tell me so that I'll know what to buy next time I need the needles!


Sunday, October 25, 2009

Let It Snow : Tutorial #2

This little tutorial will be the introduction to the beginning of a line of patterns from Cath's Pennies Designs. Hopefully, if all goes well, the pattern will be finished and ready to mail this Thursday.

NOTE: This is NOT a free design to use. The pattern for this Candle Mat can be purchased. This is a relatively easy pattern to make and my hope is that seeing pictures of it in the process of being made will make it even easier to make.
But please, buy the pattern. Just let me know of your interest and I'll happily put you on the preorder list. Special Blog preorder price is $8.00 including shipping. (For US and Canada only. International shipping costs would apply to orders outside the country)
Just let me know of your interest. Thank you for not stealing my designs. :)
For those who wish to preorder, my Paypal address is cwagner02@comcast.net . Your $8.00 payment may be sent there up until Wednesday night. After that, shipping charges will raise the price.

Let's get started on part two of the tutorial.....


This is what we're making. Let It Snow is all wool, but it can also be made with woolfelt.
Here, I've blanket stitched all of the snowmen on and now, because I have this thing about pressing, I've taken this to my ironing board. The steam from the iron will press these snowmen nice and flat.
I've learned from my mistakes .... ALWAYS use a pressing cloth when steam ironing your wool, otherwise your wool will have shiney iron marks. I use a soft flannel pillowcase here. I'll press the backside of the mat using lots of steam.
Now, I'll blanket stitch on the scarf and the carrot nose. I used black pearl cotton thread for the scarf and a matching gold/orange pearl cotton for the nose. Embroidery floss will work fine too ... don't buy pearl cotton for just the little bit that you would need for the nose. I happen to have the right color, so I use it.
Using black thread, I've backstitched the smile on my snowmen, giving them life .. my favorite part. :)
The snowflake is just embroidered stem stitching. The snowflake is 1 1/2" high and wide so I measured that out and using a chalk pencel, I lightly drew in the lines.
I used #5 DMC cotton thread for the snowflake and french knots.. Finished one, need to do 3 more and then I'll be ready to give the snowman some snow above his head.
I should be able to finish the mat up this evening and show the finished mat in the posting either tomorrow, if I've the time or for sure on Tuesday.

GO HERE for the final Tutorial Steps for this "Let It Snow" Mat.


Happy day everyone!

Friday, October 23, 2009

Let It Snow : Tutorial #1

This little tutorial will be the introduction to the beginning of a line of patterns from Cath's Pennies Designs. Hopefully, if all goes well, the pattern will be available for sale in a week or so.

For years, I've been asked to sell patterns of the things that I make, but I put it off ... just not willing to take the time away from sewing to write the patterns. It's time now and I'll start with my very popular Wool Candle mat that I made and Ebay sold last year.

EDIT: This is NOT a free design to use. The pattern for this Candle Mat can be purchased.
This is a relatively easy pattern to make and my hope is that seeing pictures of it in the process of being made will make it even easier to make. But please, buy the pattern. Just let me know of your interest and I'll happily put you on the preorder list.

Thank you for not stealing my designs. :)
Let's get started.


"Let It Snow" is made with 100% wool but it can easily be made with woolfelt if you wish. It measures about 13-14" across.

I use #8 DMC Pearl cotton threads for this along with #5 DMC for the snowflakes. Ecru, which is the main color that I will use, is easy to find at Joann Fabrics.

I've traced the pattern onto Freezer paper and then ironed the paper onto my dark blue background wool. You could trace the design right onto your wool with chalk, but I prefer the freezer paper because the paper holds the wool tight while you cut so there's no fear of stretching wool and mishappend shapes because of it. This is especially important with these scallops. Freezer paper gives you the exact shape.
With natual white wool, I've ironed the freezer paper snowman body pieces. 4 bodies with 8 arms. This is where I was going to change the design from last year. I considered making the snowman and arms as one complete pattern piece but after thinking a little more, I think it would look much better with the arms added on, so that's how it's staying! Those pieces are carefully cut out and now the sewing part starts ...
The arms and body are lined up, pinned and then blanket stitched onto the blue scallopped edge. This just looks like a big white blob right now but the fun part of giving the snowman character/a face will come next.


For the next steps ....  Tutorial #2 GO HERE!


Happy Day and Weekend everyone!

Thursday, October 22, 2009

Fall Means Christmas

As much as I'd love to stick with Fall and Halloween and all the decorations/designs that go along with it, I know that I have to keep just a bit ahead of the seasons when it comes to selling my penny rugs.
I have sooooo many good ideas for designs for this fall and Thanksgiving, but not enough time to make them. Since I HAVE to get going with the busy Christmas holiday season, I'm going to pack away my fall idea designs. I'll get them out again next August ...they will become next year's patterns.
But darn, I had a cute turkey one in my head that I'd love to do this year .... so maybe, just maybe, I won't pack all the ideas away.

Anyway, for this Christmas season, I'm going to branch out in another direction and try offering a few of my designs as PATTERNS!

I've come to realize that there are a lot more sewers/stitchers out there in blogland and Ebay than there are buyers of finished items. That realization, along with a lot of queries as to when I will offer my designs as sellable patterns, has pushed me into the decision to focus SOME of my time on making patterns to sell.

Two of my favorite hoilday designs from last year will become patterns.

This one was really popular last year. "Let It Snow" will be the first pattern that I'll offer. I'm working on this one right now. It will have some minor adjustments in the design so I will actually make one before actually printing the pattern for it. I think I'll blog the steps to making this along the way.

After the "Let It Snow" is printed, I'll focus on this one next. Oh, how I love this one and it's going to be difficult to share this one with everyone. This design is up there with some of the most favorites of all the designs that I've ever made ... and I've made a lot.

There are lots of ridiculous details with this design but it's worth the time and effort just because it's just so darn nice when it's finished.
So there ya go ... a preview of what is to come. I have a lot of work that will be involved with doing this so my time spent actually sewing will be shortened ... which is why I've put off offering patterns to begin with. I love to sew so anytime that is spent doing something else takes me away from what I love.
But it will be done, and I will blog about it the entire time. Branching out can be a good thing, hopefully.
Tomorrow will start the beginning of the "Let It Snow" tutorial.
Happy Day Everyone!

Tuesday, October 20, 2009

Fall Cleaning and EBAY

As I always say, business first ....
My Ebay listing for this is HERE . My camera seems to be in a happy mood today so I'm going to take advantage of that and spend some time taking some better pictures for the listing. As long as it has no bids on it, I can redo pictures. I have to figure out how to capture just how nice this turned out.
So of course, this is all 100% wool. I don't use wool felt. Nothing wrong with wool felt, it's just that I prefer how 100% wool looks and feels...And it's an all natural fiber, no rayon.
Ok, this is going to be called biting the hand that feeds you, but what the heck ... Ebay is messing with my head.
Ebay, the ruler of the online auction world, has now awarded me the honor of being a "Power Seller". Ok, don't congratulate me because I've done nothing different that really deserves that honor. Honestly, I've sold less this past month than I have in many, many months but yet, NOW they tell me I'm a power seller. I'm not even sure what this means, but I betcha .... I JUST BETCHA ... that next month, when they see that I haven't sold very much, they are going to STRIP my power seller award away from me, leaving me crumpled and crying in a dusty corner. :)
I'm not going to dwell. I'm going to enjoy the moment. GO HERE to see my newest design that Ebay is letting me sell. I'm a power seller now, you see, so I can powerfully sell, somehow.

Today, I was planning to blog about how I wash my wool to felt it and also a little about the different "textures" of wool and the best ways to use those textures. But, I've too much to do today to get into that, so I will have to postpone that until either tomorrow or Thursday.
Today is supposed to be a beautiful, warm Fall day so I've lots to do outside to clean up and ready the property for winter.
Our front sidewalk looks like this now.....
I always plant Marigolds along either side of the sidewalk. I like how they grow over the sidewalk as the summer progresses and then in the fall season, they look so nice ... until a hard frost hits them.
The hard frost hit them 2 days ago, so it's time to pull them all up and ready the flower beds for winter.
So the marigolds, the impatiens, the petunias and the zinnias will all be thrown over the hillside today. I'll keep the snapdragons and the mums in because they seem to enjoy the cold frosty weather. At least it's a little bit of color that I can enjoy for a while until the snow comes.
Ok, I'm outta here. Going to redo the pictures on the EBAY LISTING and then outside work .
Oh, one more thing ....
My previous blog post? The one right before this one? I KNOW it's fraught with spelling errors and bad punctuation. When I was writing it, hubby, who had the day off that day, was breathing down my neck, screaming, "DO YOU WANT TO GO OUT FOR BREAKFAST OR NOT????" while I was typing that post.
First of all, I need to remember not to mess with a hungry man. He's not patient when he's hungry. Secondly, if the guy is WILLING to take me out to a restaurant for food, I need to drop what I'm doing and take advantage of the offer.
In my haste to type and publish that last posting, I neglected to proofread ... the man was resorting to GROWLING by the time I hit the publish button so I wasn't about to take any more time with the blog. I'm a pretty good speller, but my fingers type faster than my brain sometimes and errors occur which proofreading corrects.
I should have gone back later and fixed it, but I forgot and then when I did remember, I didn't have the time.
I'm pretty sure that Rachel, the daughter, knows my password into this, so if it bothers her so much, she's welcome to hit the EDIT button and correct my errors.
Otherwise, the errors are staying. It just shows that even I, am not perfect.
This post, however, will be proofread!
Happy day everyone!

Friday, October 16, 2009

Skinning the Wool Skirts + Candle Mat Finished!

Business first and then we can talk about tearing apart wool skirts and jackets.

I finished up the newest design of mine ... haven't thought of a name for it yet though. I'll be Ebay listing this tonight OR Sunday night, depending on whether my dang camera will cooperate. Just click on my EBAY link here to see if I've whipped my camera or my camera has whipped me. If it's whipped me, this candle mat will be listed on Sunday. :)

This is the example showing what I have to deal with just about every time with my camera especially on overcast, dreary days like today (it was actually snowing a little this morning). I'm not going to fight this camera today ... it just takes too much time. I'm going to let you edit these pictures in your head.


The picture above is without the flash and you can see it's too dark.....


And the picture above was taken WITH the flash and it's way too bright. So all you have to do is look at both of these and edit the pictures in your head so that the colors in this wonderful candle mat look not too bright and not too dark , and you'll get the TRUE colors of what this mat looks like. Sheesh...I need a new camera, or a new ME that knows how to properly take pictures.


Ok, now let's get to the main topic here. I had to laugh and laugh at the comment from my previous post when the commenter compared tearing down wool clothing to skinning a squirrel. I've never skinned a squirrel but it is a great comparison with wool being a little less messy ... no blood to deal with.

This is what I have to tear apart today. One skirt and one jacket. I wish I had a video camera because actually showing it would make it a lot easier to understand.

I really don't like breaking down jacket for the wool, because there's actually very little wool that you can get from them and the pieces you do get are small. So, I only buy jackets if the colors or textures are really terrific and different.


This is a close up of the wools. The jacket is a super nice blend of fall colors that will be nice to use for fall leaves or scarecrow clothes or I could overdye it for pumpkins. It has the potential for lots of uses. The black skirt is a wonderful tweed. It's a woven wool though and sometimes the felting doesn't shrink this type of wool enough to used for anything other than backgrounds ... smaller pieces would fray too much. But this wool is so nicely textures with tweeds that I only want to use it for backgrounds anyway. But we'll see once it's washed and felted what it looks like.

Let's start with the skirt. Now keep in mind, this is how I do it. There's lots of different ways and there's no right or wrong way, just easiest/more time consuming ways.

I don't wash and felt the clothing first. I tear it apart first and then wash. Because of that, be sure to vacuume well after you're done because ya never know for sure if there's any vermin in that wool that might hop out and scurry over to your other wool to find shelter and food!

First thing I do is cut off the waistband. Cutting it off will release that inner lining. Long ago, I used to carefully tear apart the seams on the waistband so that I could save every scrap of the wool. That takes too long for me now ... so .......

Yes, I trash the waistband. Yes, it's wasting good wool but it's also wasting my time. If YOU want to take the time to tear apart that tight stitching, rip out the innerfacing just to get a 2"wide piece of wool, I'll happily mail you all my waistbands instead of throwing them out.

Once the waistband is off, cut around the zipper ... this one didn't have a zipper, just a clasp at the side opening. Zippers get thrown out too. If you collect zippers, save it for your collection.

That inner lining is released from the top now so I turn the skirt inside out and pull out the remaining lining. It gets thrown out too.


Most times, the hem is loosely stitched, so snip a few threads and then using the strength of 10 men, rip that hem right out. If there's seam binding on the edge, cut or rip that out too.

Snip a few threads that join all the seams and rip apart all the seams creating your panels of wool. This skirt was nice in that it only had two panels of wool .. the front and back. Most times, the skirt has three panels with two in the back with a zipper and the one big panel in the front.

There! I'm done with the skirt! Ready to wash now!


Ohhh ... darn, I have that jacket to do. I really REALLY dislike skinning jackets, but it must be done and I'll do it as quickly as possible......

First, I cut off all the buttons. I collect buttons, so I save them.

Chop off those sleeves. Long ago, I used to carefull tear apart all the seams so that no wool was wasted. No more! I chop. I waste wool, yes, but for jackets, it just takes waaaay too much time to tear apart seams.

Turn the sleeves inside out and CHOP off the end of the sleeve where the lining is joined.

Snip a few stitches of the sleeve seams and then rip them apart. Sometimes those seams cant be easily ripped so scissors might be necesarry to help it along.

You don't get much wool from sleeves, but since this is exceptionally nice wool, it's worth the effort.


Now let's attack the main part of the jacket.

Tear out the lining. Chop it out with scissors. I don't mess with ripping it out at the seams, I just chop it out close to the seam.

Rip out the hem, cutting any seam binding off. Then rip out the seams that connect the front jacket panel to the back jacket panels.

Now, since the back of the jacket has such small panels, I won't rip these apart at the seams. I'll just leave the seams intact and wash it this way so that it doesn't fray too much.

The worst part now is the front panels. They always have that interfacing that has to be torn out and they always have pockets and button holes ... ugh, it's hateful to rip apart the fronts so I just quickly chop out the pocket linings and try to get off as much as the interfacing that I can.

Luckily, this interfacing peels off fairly easily. Sometimes the interfacing is so tight that it has to be left on. Also, sometime washing helps loosen the interfacing . In this case though, it's off.

I'll wash this panel just as it is here. The other panel with the button holes is chopped up more than this because I have to cut around all the button holed to get the lining out.


All that is left now is the collar and the front jacket lapels. That's getting trashed though because it takes waaaay too much time to rip open the seams and remove the interfacing. I know, it's wasted wool, but my time is more valuable.

So that's it! Here's my pile of wool that needs to get into the washer. I'll have to give my washing/felting instructions next time though, because hubby is off today and he's very impatiently waiting to go out to the hot dog shoppe to get some yummy breakfast. No, not hot dogs ... they have really good breakfasts there that don't contain hot dogs!


Oh yes, one more thing ... Again, let me stress how important it is to vacuum the area where you've worked. Wash your hands well and if you can't wash this wool right away, make sure to put it somewhere away from your other good wool.... this is going down in the basement beside my washer or put it outside or anywhere that it won't contaminate your good wool.

Happy day everyone!
**EDIT NOTE*** It took me a while to write about how I felt/wash the recycled wool but those instructions can be found HERE !

Wednesday, October 14, 2009

Let's Shop For Wool Today, Shall We?

Today is a really good day to shop at my local Salvation Army Thrift Store. I haven't been there for a while and fall always brings out the wool clothes at thrift stores. Want to come with me? Ok!
The thrift store that we're going to today isn't my favorite one, but it is the closest one that has the largest selection of wool. It's in the nearby little "city" of Beaver Falls.
Beaver Falls isn't really the best of areas for shopping ... it's your typical slightly run down main street town with little of interest but ... it does have some really great places that make it worth the short drive. At the beginning of town, I always stop at the little fruit market. I didn't get a pic but they sell locally grown fruits and veggies and they have a nice deli with very reasonable prices on lunchmeats and cheeses. The Beaver Valley Fruit Market is where I bought the big as your head cabbage for only29 cents a lb. (made stuffed cabbage with it)

Just a few blocks up from the Fruit Market is McMahon's Harley Shop. Sorry the pic is bad .. .. I miss-aimed and didn't get the sign like I wanted. The owners here are like family to my Harley obsessed husband ... family that takes lots of money out of your pocket while giving you a hug, that is.
Yes, indeed, this Harley shop has been given a lot of our money over the years, but if you own a Harley, you know it's something that HAS to be done. The owners here are friends and are good people so if you need a $25,000 Harley, McMahon's is the place to go!
I'm going to drive right by the place that Beaver Falls is most famous for ... Orams Donuts.
Orams has as big as your face cinnamon roll donuts that are so good that just looking at them will put on 5lbs.
To save you all from weight gain, I did not take a picture of the place. .. well that and there was a big truck in front of the place and no place to park to get the picture.
Here we are parked at the Salvation Army Thrift Store. This is a picture of the tattoo/piercing place that is across the street from the Thrift Store. I detest that blue building and I'm happy to see the sign stretched across it saying that they've moved to another location.
This is the place that my dear innocent Rachel, right after she turned 18, went to get some odd location on her ears, pierced. She's has a video somewhere of the friend that was with her almost passing out while watching the piercing being done.
Thankfully, no tattoos, (that I know of) were burned into her skin but really, how dare they punch/drill holes into my daughters ears without me knowing about it! (love ya Rach and I'm glad your ears didn't fall off after you finally decided the the pain and infection weren't worth the coolness factor of having a piercing in the cartilege of your ears)


Yes, there are parking meters in front of the Thrift Store and I always put a dime in it to get 30 minutes of time because I've found out that the 15 minutes that a nickel gives you, will also give you a $1 parking ticket if you go 2 minutes passed that 15. My parking meter, however, seems to be broken and won't allow me to insert any money. We will be in permanant violation while in the Thrft Store and if I get a $1 parking ticket for this, you are my witnesses and I will fight it.

Stepping into the thrift store, the sign tells me about today's special ... yes! It's half price day for all clothing and shoes, except for white ticket. Wool skirts at half off the already low price is a real bargain!
I make an immediate right and head over to the linens and fabric rack that's against the wall. See that round table and chairs? $599.00 for that! Are you kidding me? If I pay $599.00 for anything from a thrift store, it better walk and talk, do my laundry, cook my dinner and wash my dishes.
Anyway, sometimes I find some nice wool yardage on this rack, but no luck today. They sometimes have nice old tablecloths, but no luck today with that either.
Turning the corner from the linens brings me to the rack with the bedspreads, sheets and draperies. We want to go to the end of this rack where we might find some nice wool blankets.No luck this time. There is a nice wool shaw type throw but it's way too thin to use for penny rugs. What a shame. It's only $4.99 and that color would dye nicely but it's so thin that no amount of soap and hot water will felt it enough to make it worthwhile. I looked for a tag on it to prove that it's wool, but saw none. I've done this long enough to be able to tell just by how it feels that it's wool though but darn it ... it's too thin.

Next we'll go to the rack of skirts. This store is nice because they organize all the clothes by color not size. I start at the back where the black skirts are. I really don't need plain colors of wool so I'm looking for tweeds and plaids and textures. There are lots of plain black wool skirts, but I'm passing them by today.
This skirt is a good find ... it has some texture and it's not plain black. Little flecks of white make it a nice find ... except.... you can't tell from the picture but it has too many seams in it. Usually skirts have one large panel of wool in the front and two panels of wool in the back. This one has three panels in the front and back. Each panel would only be about 10" wide, so it's just not enough wool to make it worthwhile. What a shame, but I'm passing this one up even if it would only cost $2.
I always check out the rack with the winter scarves too. Every once in a while a wonderful wool scarf can be found. No luck this time though.
Let's head over to the winter coat rack. Now, winter coats ... I don't usually buy them but if there's an exceptional white or black wool coat, I will consider buying it if the panels are large enough and if it's not too dingey looking. No luck today though and I'm glad because it's a lot of work to tear down a coat for the wool.
For a little break, I check out the wall of toys. I've found so many wonderful toys here for the grandson ... heck most of the toys we have at home for him are from thrift stores. I only buy the ones that I can wash though.
Nothing much here today, so no new toys.

The last place we will look is the men's sport coats. If I need some wonderful wool tweeds, houndstooth, plaids or just great blends of colors, this is where I find it. Jackets are difficult and time consuming to tear apart so I don't often buy them, but I always try to keep a good supply of different textures in my wool stash because they are so nice to use to add that extra textured look to the penny rug.
I didn't buy anything! I'm lucky because I really do have more than enough wool at home so lately, I just look for exceptional colors ... like fall colors or plaids. I will always buy the wool blankets, no matter what color, because I like to use them for backgrounds.
When looking at your own thrift stores, if you're not absolutely positive that it's not 100% wool, don't buy it. Look for the label! Most quality wool garments have the identifying 100% wool label. Wool blends won't felt or dye nicely.
Tomorrow, if I can, I'll show how I tear down the wool garments and how I wash/felt them.
Happy Fall Day everyone!